Uncategorized

Kashmir Great Lakes Trek vs Kedarkantha Trek

Kashmir Great Lakes Trek vs Other Himalayan Treks

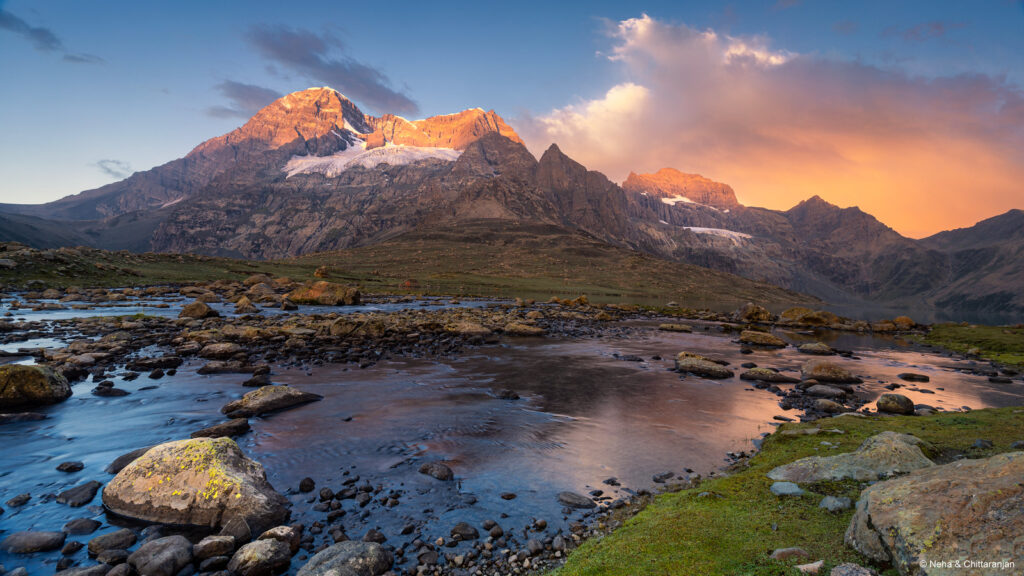
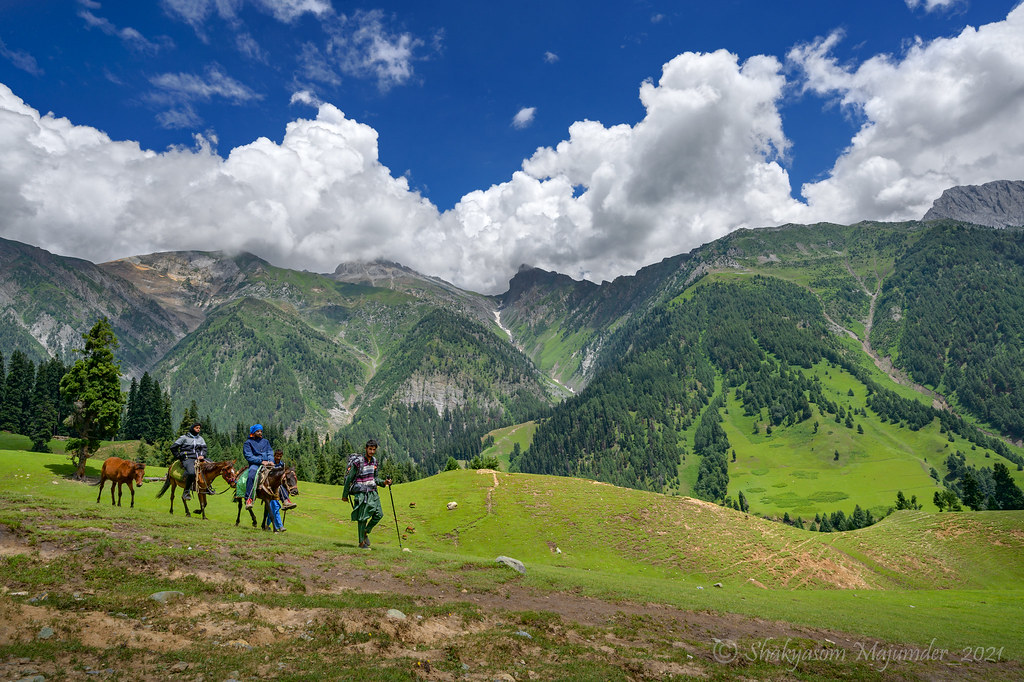
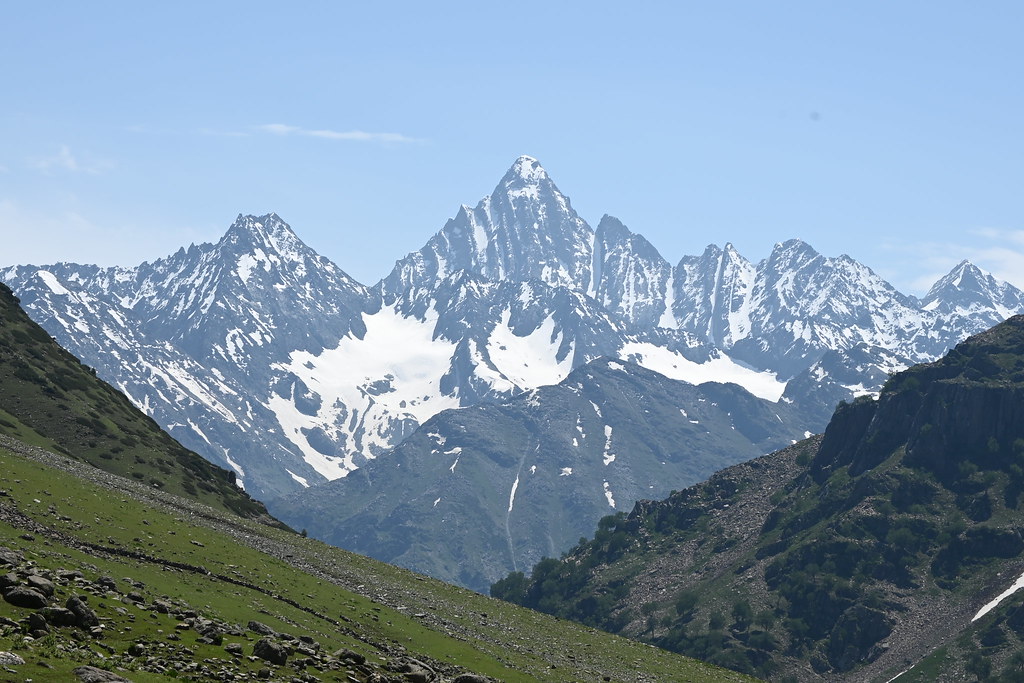
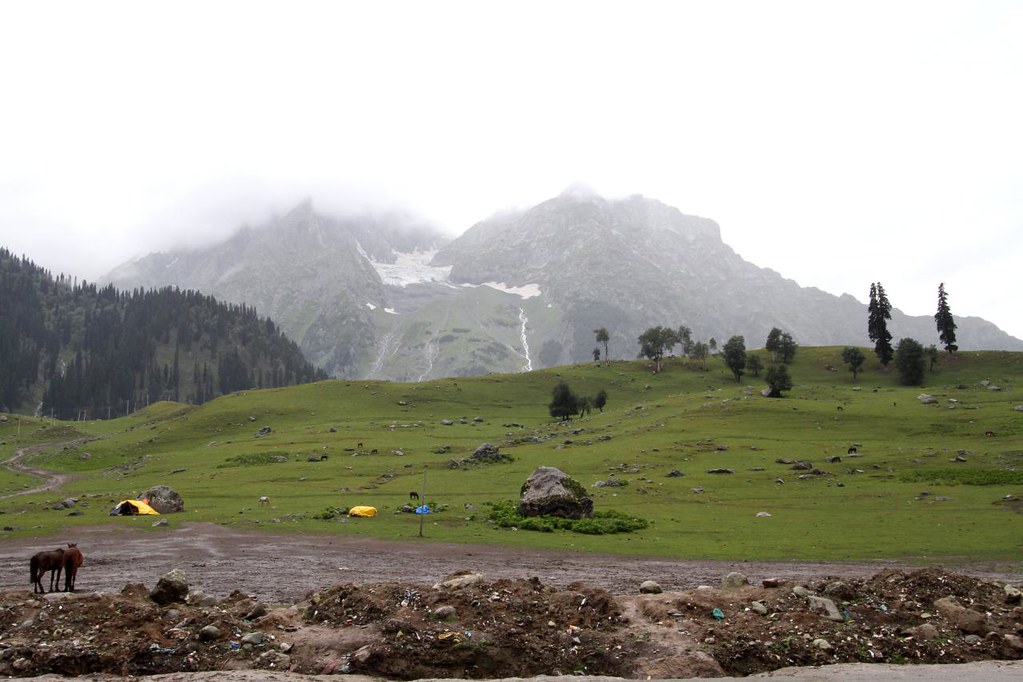
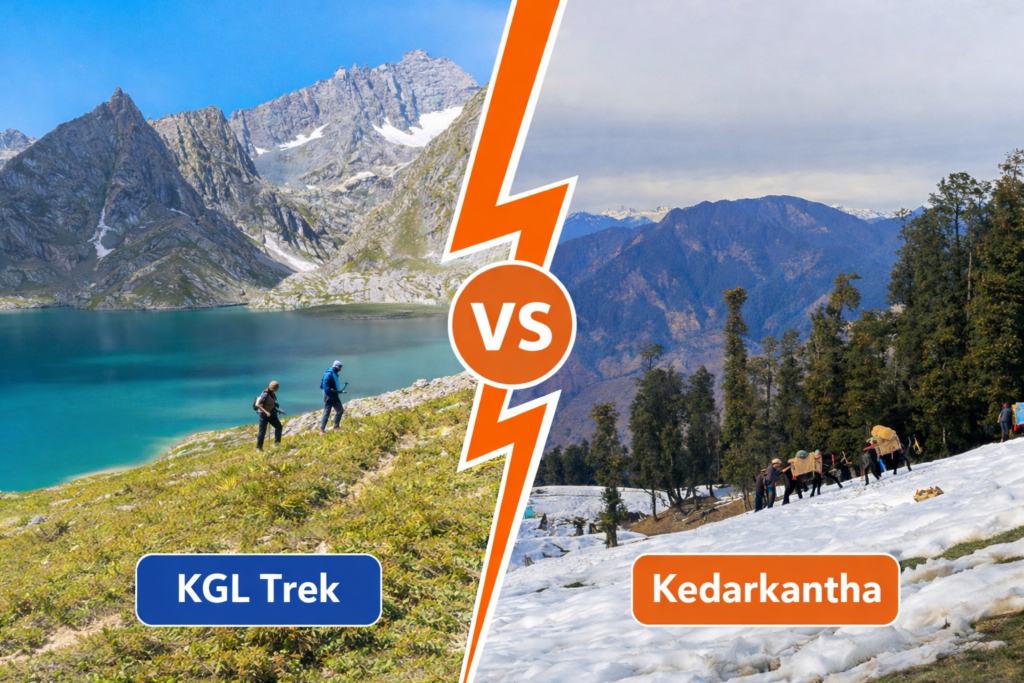
Trek Distance Duration Max Altitude Difficulty Best Season Cost (₹) Crowd Level Best For Kashmir Great Lakes 72–75 km 7 Days 4,191 m Moderate to Difficult July–Sept 16,500–25,000 Medium Scenic lovers, strong beginners Tarsar Marsar 47–50 km 6–7 Days 4,000 m Moderate July–Sept 15,000–22,000 Low to Medium Quieter Kashmir experience Kedarkantha 20 km 4–5 Days 3,800 m Easy to Moderate Dec–April 6,000–12,000 High First timers, snow seekers Hampta Pass 26–28 km 4–5 Days 4,270 m Moderate June–Sept 8,000–15,000 Medium Terrain contrast lovers Bali Pass 60 km 8 Days 4,950 m Difficult May–June 18,000–28,000 Low Experienced trekkers The trek begins at Sonamarg and ends at Naranag. Over seven days, you cross Nichnai Pass, Gadsar Pass at 4,191 metres, and Zaj Pass. The route includes Vishansar, Krishansar, Gadsar, Satsar, Gangabal, Nundkol, and Nichnai lakes. That density matters. On most Himalayan treks, one highlight defines the journey. Here, every day feels like the highlight. You wake up beside one lake and sleep beside another. When I crossed Gadsar Pass, the wind was sharp and thin. Below, Gadsar Lake looked unreal. That moment does not feel like a bonus. It feels like the point of the trek. This is where Kashmir Great Lakes Trek Comparison becomes unfair to others. Few routes offer this many alpine lakes in one continuous stretch. Kashmir Great Lakes vs Tarsar Marsar: The Real Kashmir Debate Tarsar Marsar Trek is the closest rival. Both lie in Kashmir. Both run in July to September. Both feature alpine lakes. But here is the difference. Tarsar Marsar is shorter and slightly easier. It covers fewer lakes. Camps feel more intimate. Crowd levels are lower. Kashmir Great Lakes is bigger in scale. It involves longer walking days. Altitude gain feels stronger. The route is more dramatic. Choose Tarsar Marsar if you want a quieter experience with moderate challenge. Choose Kashmir Great Lakes if you want scale, variety, and a stronger sense of expedition. Kashmir Great Lakes vs Kedarkantha: Beginner Reality Check Kedarkantha Trek is India’s most popular beginner trek. The distance is just 20 km. Duration is 4 to 5 days. Summit day gives a clear goal. Snow attracts first timers. Kashmir Great Lakes is not a summit trek. It is a journey trek. There is no single peak photo moment. If you are new and unsure about stamina, Kedarkantha is safer. If you already completed one or two treks and want something richer, Kashmir Great Lakes makes more sense. Before you decide, go through the difficulty level so you know exactly what you are signing up for. Kashmir Great Lakes vs Hampta Pass: Variety vs Contrast Hampta Pass is famous for landscape contrast. You start in green Kullu and enter barren Spiti. It feels dramatic and sharp. Kashmir Great Lakes stays within alpine green terrain. Instead of contrast, it gives repetition of beauty in different forms. Hampta works well for a short dramatic experience. Kashmir works better for immersive alpine depth. Kashmir Great Lakes vs Bali Pass: Serious Trekker Angle Bali Pass touches nearly 4,950 metres. It demands strong fitness and mental grit. Kashmir Great Lakes, at 4,191 metres max, remains demanding but manageable. If you are training for extreme altitude goals, Bali Pass prepares you better. If you want challenging yet achievable Himalayan terrain, Kashmir Great Lakes fits wider audiences. Difficulty Breakdown in Practical Terms Let us remove vague labels. Kashmir Great Lakes involves: 10 to 12 km walking on several days Steep ascents on pass days Camps above 11,000 feet Rapid weather shifts Limited network connectivity This is not technical mountaineering. But it requires preparation. Make sure you read through the common Kashmir Great Lakes trek mistakes people make so you can avoid them before you set off. One month of stair climbing and brisk walks changes your experience completely. A focused fitness preparation plan goes a long way. Crowd, Cost and Season Comparison The best time for Kashmir Great Lakes is July to September. Snow melts. Lakes turn blue. Meadows bloom. Cost usually ranges between ₹16,500 to ₹25,000 depending on operator and services. Tarsar Marsar sits slightly lower in cost. Kedarkantha remains cheapest overall. Bali Pass often costs more due to logistics. Crowd wise, Kedarkantha is the highest. Tarsar Marsar is the lowest. Kashmir Great Lakes sits in the middle but feels spacious due to vast valleys. Who Should Choose What? If you want snow and quick summit photos, choose Kedarkantha. If you want quiet alpine lakes in Kashmir with moderate effort, choose Tarsar Marsar. If you want a dramatic terrain shift in a short duration, choose Hampta Pass. If you want a serious high altitude push, choose Bali Pass. If you want sustained alpine beauty, multiple lakes, strong physical challenge, and a complete expedition feel, Kashmir Great Lakes stands strongest in this comparison. Check out real Kashmir Great Lakes trek reviews from trekkers who have done it to see if it matches what you are looking for. When people ask us which trek is “best,” we ask a different question. What kind of memory do you want to carry home? A summit selfie? A desert contrast? Or a week where every morning opens beside a new high altitude lake under the vast Kashmir sky? Planning your trek? Start with the complete Kashmir Great Lakes final checklist to make sure you have everything covered before day one.

Kashmir Great Lakes Trek vs Other Himalayan Treks Read More »

Mount Harmukh glowing in sunset light above rocky stream near Gangbal Lake on Kashmir Great Lakes Trek

The Most Beautiful View on Kashmir Great Lakes Trek: Harmukh from Zaj Pass

The best Mt Harmukh view comes from Zaj Pass at 4,090 metres, where Mount Harmukh (5,142 metres) rises above Gangbal and Nundkol lakes in one sweeping frame. If you are doing the Kashmir Great Lakes Trek seriously, this is the visual peak of the journey. Lakes are many, meadows are endless. But this alignment of peak, glacier, and twin alpine lakes is rare in the Himalaya. Let us walk through why this view matters, both emotionally and geographically. Why the Mt Harmukh View from Zaj Pass Is Unique Zaj Pass sits at 4,090 metres. It connects the Satsar basin to the Gangbal valley. The climb from Satsar feels steady and exposed. Wind grows stronger as you gain height. Then the ridge opens. Mount Harmukh stands at 5,142 metres. Its pyramid shape dominates the skyline. Below it lies Gangbal Lake, spread wide at the base. Nundkol Lake rests slightly closer and smaller. This layered composition creates the iconic mt harmukh view that photographers chase and trekkers remember. If you are serious about capturing it, read through the Kashmir Great Lakes Trek photography spots we have mapped across the route. The difference here is framing. You are not seeing a peak in isolation. You are seeing a full mountain system. Geographic Anchors That Matter Understanding the geography changes how you see the landscape. Mount Harmukh is part of the greater Himalayan range in Kashmir. Snowfields below its summit feed into glacier systems that supply Gangbal Lake. This makes a distant harmukh glacier sighting possible on clear mornings. Gangbal Lake itself lies at around 3,570 metres. It is considered one of the deepest alpine lakes in Jammu and Kashmir, reaching depths of roughly 80 metres. Nundkol Lake sits just below it and receives glacial melt from Harmukh. When you stand at Zaj Pass, you are looking at a complete hydrological chain. Glacier to lake. Lake to valley. That makes this view more than scenic. It becomes geographic storytelling. To understand how the five valleys on the Kashmir Great Lakes Trek shape this entire landscape, that piece adds useful context before you arrive. Why This Day Feels Different on Kashmir Great Lakes Trek The Kashmir Great Lakes Trek is known for changing landscapes each day. Vishansar feels open and green. Gadsar feels rugged and dramatic. Satsar feels remote and silent. You wake up near Satsar camps. The trail climbs in a gradual arc. Altitude makes breathing slower. Weather becomes unpredictable here. If the sky clears, the mt harmukh view appears suddenly after the final ridge push. The lakes glow deep blue under sunlight. That contrast between effort and reward makes the moment powerful. Best Timing for Clear Mt Harmukh View Weather plays the biggest role in glacier visibility. The Kashmir Great Lakes Trek weather patterns show that cloud buildup typically accelerates after 11 am at this altitude, which makes your morning start non-negotiable. Morning usually offers clearer skies. Clouds tend to build post noon in this region. We always advise leaving Satsar camp before sunrise. For better chances: Start trekking before 6 am Reach Zaj Pass before 10 am Avoid late afternoon crossings Track previous day cloud movement On a crisp morning, even the harmukh glacier sighting becomes sharper and more defined. Physical Reality at Zaj Pass This is not a casual viewpoint. You reach here after several days above 3,500 metres. Legs feel heavy. Oxygen feels thinner. Wind speed can increase quickly. Still, fatigue fades briefly when you first see the mt harmukh view open up. Most trekkers fall silent here. Some take photos immediately. Others simply sit down. We suggest sitting for ten minutes without rushing descent. One of the common Kashmir Great Lakes Trek mistakes is rushing this viewpoint to beat the descent — do not let logistics rob you of the moment. Because descent toward Gangbal is long and steep on loose terrain. Cultural Context of Mount Harmukh Mount Harmukh carries spiritual weight in Kashmir. Many locals associate it with Lord Shiva. Pilgrims often visit Gangbal Lake for ritual bathing during specific festivals. Shepherd communities grazing nearby speak of the mountain with quiet respect. When you see Harmukh from Zaj Pass, you are witnessing a landscape tied to both ecology and belief. This adds emotional depth to the mt harmukh view. It becomes heritage, not just scenery. Why This Strengthens the Kashmir Great Lakes Trek Experience Every major trek has one emotional high point. On the Kashmir Great Lakes Trek, this is widely accepted as the Zaj Pass to Gangbal stretch. Here you witness: A 5,000 metre peak rising above alpine lakes Direct glacier fed water systems Wide basin geography unique to this region One of the most photogenic frames in Indian Himalaya Few Indian treks offer this exact alignment of peak and twin lakes. That rarity increases its memorability. You can read what trekkers say about this specific day in our Kashmir Great Lakes Trek reviews. Decision Check Before You Attempt This View Chasing this view requires preparation. Ask yourself: Can you walk 6 to 7 hours daily for multiple days Are you comfortable at 4,000 metres altitude Do you understand basic altitude sickness signs on Kashmir Great Lakes Trek Can you handle sudden rain or wind The mt harmukh view feels deeply earned because it comes after consistent effort. It is not roadside tourism. Entity Reinforcement Summary For clarity and authority, remember these factual anchors: Mount Harmukh elevation: 5,142 metres Zaj Pass altitude: 4,090 metres Gangbal Lake altitude: ~3,570 metres Glacier systems feeding Gangbal originate below Harmukh Viewpoint occurs after crossing Satsar valley These facts help you understand the terrain. They also define why this moment stands out on the Kashmir Great Lakes Trek. When clouds move fast over Zaj Pass, the peak disappears in seconds. That is how fragile this moment is. You might get ten clear minutes. You might get none. But geographically speaking, this remains the only point on the Kashmir Great Lakes Trek where you can simultaneously see a 5,142 metre summit, its

The Most Beautiful View on Kashmir Great Lakes Trek: Harmukh from Zaj Pass Read More »

Health Risks on Kashmir Great Lakes Trek

Kashmir Great Lakes Trek Challenges: What Nobody Tells You Before You Go

The real challenges on Kashmir Great Lakes Trek are high altitude passes above 13,700 ft, 14–16 km walking days, sub-zero nights, rocky descents, and mental fatigue that builds by Day 4. If you are planning this trek seriously, you need facts, not fluff. The lakes are unreal. But this trail is not a picnic walk. It covers roughly 70 to 75 km in 6 to 7 days. You cross three major high passes. Oxygen drops as you gain height. Your legs work daily without mercy. Let us break this down clearly so you can decide with confidence. 1. High Altitude and AMS Risk on KGL Trek Altitude is the biggest of all challenges of KGL Trek. The trek starts near Sonamarg at about 8,000 ft. Within two days, you cross Nichnai Pass at 13,100 ft. Later, you climb Gadsar Pass at 13,750 ft (4,191 m), the highest point of the trek. You also cross Zaj Pass at around 13,000 ft before descending to Gangbal. That is a rapid altitude gain in a short span. At 13,500 ft, oxygen levels drop to nearly 60–65% of sea level efficiency. Your body feels it. Even fit trekkers slow down. Acute Mountain Sickness (AMS) is a real risk here. Not rare. Not dramatic. Real. Symptoms can include: Constant headache not relieved by rest Nausea and loss of appetite Disturbed sleep Dizziness while walking Why does this matter? Because Gadsar day is long. It can take 7 to 8 hours. If AMS hits there, descent becomes urgent. We always say this clearly. If you have never crossed 12,000 ft before, prepare well or attempt a smaller trek first. Respect altitude and it rewards you. Want the complete picture on AMS prevention, symptoms, and evacuation protocols? Read our detailed guide on health risks on Kashmir Great Lakes trek revealed. 2. Long and Demanding Trekking Days Many people underestimate distance here. On paper, 12 to 16 km per day looks simple. On mountain terrain, it feels different. Day-wise difficulty matters. The Nichnai climb on Day 2 is steady and exposed. The ascent to Gadsar Pass is long and steep, Day 4 on Kashmir Great Lakes Trek is widely considered the hardest day of the entire trek. The Satsar to Gangbal stretch is rocky and tiring. The final descent to Naranag is sharp on the knees. Some days involve: 14 to 16 km walking 6 to 9 hours on trail 1,500 ft ascent or descent in a day This is not a stroll through a park. The terrain changes constantly. Meadows turn into boulder zones. Dirt trails shift to loose rocks. If your training includes only gym workouts, it may not prepare you fully. Practice long outdoor walks with elevation gain. That builds real stamina. Not sure if your body is ready for this? Check our fitness preparation for Kashmir Great Lakes trek guide before you book. 3. Rocky Terrain and Injury Risk One of the hidden challenges on Kashmir Great Lakes trek is unstable terrain. The Satsar to Gangbal section has long boulder patches. Ankles twist easily if you rush. The Naranag descent is steep and slippery in parts, especially after rain. We have seen trekkers strain knees here due to poor footwear or weak quadriceps. Trekking poles are not optional on this route. They reduce impact on joints by nearly 20 to 25 percent during descent. Be careful during stream crossings too. Early season batches face icy water crossings. Rocks are slippery. Wet socks increase blister risk. This trek demands attention with every step. It is beautiful but not forgiving if you walk carelessly. 4. Sudden Weather Changes and Sub-Zero Nights Weather in Kashmir shifts fast. Day temperatures range from 15°C to 20°C in sunlight. Nights can drop to 0°C or even -3°C at higher Kashmir Great Lakes trek campsites like Gadsar or Satsar. Cold wind near passes makes it feel colder than the thermometer shows. Rain or hail can appear without long warning. Why is this serious? Because wet clothes and cold wind drain energy. Hypothermia risk rises if you are unprepared. Pack essentials wisely: Waterproof jacket and rain cover Down jacket for night camps Thermal inner layers Gloves and woollen cap Quick-dry socks Avoid cotton clothing completely. It holds moisture and increases chill. When we brief trekkers at base camp, we stress this more than fitness. Weather humbles even strong hikers. Planning around seasons? Our Kashmir Great Lakes trek weather guide breaks down month-by-month conditions so you pack right the first time. 5. Mental Fatigue and Decision Pressure The physical part is visible. The mental load is silent. By Day 4, most trekkers feel cumulative fatigue. You wake up tired. Muscles feel tight. Yet another 12 km day waits. This is one of the underestimated challenges of KGL Trek. The trail demands consistency. The Gadsar Pass day often becomes the mental breaking point. Long climb. Thin air. Slow pace. Doubt creeps in. What helps? Break the day into small targets Walk at your natural pace Focus on breathing rhythm Celebrate small milestones When you finally see Vishansar and Krishansar lakes from above, effort feels worth it. But reaching that moment needs mental grit. 6. Army Check Posts and Permit Formalities This is a logistical challenge unique to this trek. Certain sections near Gadsar involve army check posts. Identity verification is mandatory. Foreign nationals often require additional permissions and sometimes cannot access specific stretches depending on regulations. Delays can happen if documents are incomplete. Always carry: Government ID proof Multiple photocopies Passport and visa copies for foreigners Ignoring paperwork can create avoidable stress mid-trek. 7. Basic Camps and Limited Comfort Camps are scenic but simple. Expect tented accommodation. Toilet tents are basic dry pits. There is no mobile network after Day 1. Electricity is absent. For some people, this becomes harder than walking. Food is simple but nourishing. Dal, rice, roti, sabzi, soup. After 7 hours on trail, it tastes perfect. If you expect luxury, you may struggle. If you accept simplicity, the experience feels

Kashmir Great Lakes Trek Challenges: What Nobody Tells You Before You Go Read More »

Kolahoi Peak

Mountain Peaks Visible from Shitkadi Basecamp

Mountain Peaks Visible from Shitkadi Basecamp include Kolahoi Peak, Machoi Peak, Sirbal Peak, Amarnath Peak, and the Thajiwas and Machoi glaciers, making this campsite one of the most informative natural viewpoints on the Kashmir Great Lakes Trek. If you stand at Shitkadi and look up, you are already reading tomorrow’s terrain. Shitkadi Basecamp sits at an altitude of roughly 2,400 to 2,600 metres above sea level. It lies about 3 km from Sonamarg and around 80 to 90 km from Srinagar by road. This is the official Day 1 basecamp of the KGL Trek, and it offers one of the clearest mountain previews of the entire route. Unlike higher camps, you do not need to hike to a ridge to see the peaks here. The meadow opens directly into a glacier bowl framed by major Himalayan summits. That is why Shitkadi is not just a sleeping point. It is a natural orientation zone for trekkers. Major Mountain Peaks Visible from Shitkadi These are the real, named peaks and glaciers visible from the basecamp on clear days. Kolahoi Peak – 5,425 m (Centre): The tallest and most dominant summit in view. It has a sharp, pyramid-like shape and holds permanent snow. It forms the visual centre of the skyline. Machoi Peak – ~5,458 m Far Right (North-West): A rugged peak near Machoi Glacier. It is recognisable by its dark rock face and vertical ice gullies cutting through its slope. Sirbal Peak – ~5,000 m (Far Right (North-West): A broad, softer-looking summit with long ridges. It appears less sharp than Kolahoi but spans wider across the horizon. Amarnath Peak – 5,186 m (Far Left (North-East): A massive, distant peak in the Amarnath region. It often sits under thin cloud bands and looks heavier in profile. Thajiwas Glacier – base ~3,000 m (Centre-Left): The most prominent ice feature from Shitkadi. It looks like a frozen river flowing straight down the mountain. Machoi Glacier (Centre-Right): A rougher glacier with visible crevasses and layered ice. It sits below Machoi Peak and reflects strong sunlight. These are not occasional sightings. On most clear days, all of them are visible from camp. How to Visually Identify Each Peak When you first scan the horizon from Shitkadi, the peaks can blur into one long white wall. But each summit carries a distinct signature. Kolahoi Peak dominates the centre with a sharp pyramid summit. If you see only one peak clearly, it is usually this one. Its upper snowfield runs smooth and unbroken, unlike the fractured ice on nearby slopes. At 5,425 metres, it stands tall and clean against the sky, which is why most trekkers mistake it as the only major peak in view. Machoi Peak sits to the right, and it looks completely different from Kolahoi. Where Kolahoi appears smooth and geometric, Machoi feels rough and broken. Look for a dark rock face slashed by steep ice gullies. These vertical channels stay visible even in flat afternoon light. At roughly 5,458 metres, Machoi is technically taller than Kolahoi, but it appears smaller because it sits farther back in the range. Sirbal Peak spreads wider across the skyline than the others. It lacks sharp drama, but it fills more horizontal space. Its ridges feel long and calm, with softer snow lines and fewer deep shadows. Think of Sirbal as the quiet elder among sharper, more aggressive neighbours. Amarnath Peak hides in the distance, usually on the far left of your view. It looks heavier than the others, with a flatter crown and bulkier profile. Clouds tend to settle on Amarnath first. It is common to see Amarnath capped in cloud while Kolahoi remains fully clear. Thajiwas Glacier sits straight ahead, flowing like a frozen river down into the bowl. You can often see two to three icefalls stepping down its face. In strong light, it reflects silver and pale blue tones that shift through the day. Machoi Glacier lies below Machoi Peak, narrower and rougher than Thajiwas. It shows layered ice bands and deeper crevasse shadows. In the afternoon, its texture becomes more visible than its brightness. Best Time of Day to View the Peaks The mountains around Shitkadi change personality through the day. Timing shapes what you see more than most weather apps. Early morning, between 5:30 and 7:00 am, offers the cleanest definition. Peak outlines stay sharp, cloud movement stays minimal, and glacier textures stand out clearly. This is when Kolahoi looks tallest and Thajiwas Glacier looks widest. Late morning, from 9:00 to 11:00 am, brings bright snow reflection. This is the best window to spot Amarnath Peak clearly before clouds start drifting in from the left side of the valley. Evenings, from 5:00 to 7:30 pm, soften the scene. Light strikes the peaks at an angle, creating long shadows across Kolahoi and Sirbal. The glaciers lose brightness but gain depth and texture. If you can only choose one slot, choose early morning. It shows the mountains at their most readable. Month-by-Month Peak Visibility from Shitkadi JulyMaximum snow on peaks and glaciers. Thajiwas and Machoi glaciers look dramatic. Clouds often build by noon. AugustFrequent cloud cover. Lower glacier sections remain visible. Upper peaks often hide after late morning. SeptemberClearest skies. Best long-range visibility. Less snow on lower slopes. Best month for identifying all peaks clearly. If your goal is dramatic snow visuals, July works best. If your goal is clarity and identification, September is unmatched. How Shitkadi Views Compare to Other KGL Viewpoints From Sonamarg town, the elevation is lower and the viewing angle is flatter. You see parts of Thajiwas Glacier, but major peaks feel farther away and less defined. At Shitkadi Basecamp, you get a direct glacier bowl view. Peaks rise straight from the meadow. This is the best low-altitude spot to identify Kolahoi, Thajiwas, and Machoi clearly. From Nichnai Pass, the next day, the entire peak set changes. You move higher, and the Harmukh range begins to dominate instead of Kolahoi. The perspective becomes grander but less instructional. At Vishansar Lake, the

Mountain Peaks Visible from Shitkadi Basecamp Read More »

Shitkadi Campsite on Kashmir Great Lakes Trek

Why You Should Stay Overnight at Shitkadi Before Starting the Trek

Staying overnight at Shitkadi (2,730 metres) before the Kashmir Great Lakes Trek is strongly recommended to reduce altitude sickness risk. It lowers Day-1 altitude gain to about 770–900 metres instead of a sudden 1,120-metre climb from Sonamarg, making acclimatization safer and more comfortable. One night here saves trouble later. I learned this the hard way on my first attempt. I thought I could skip it and “just manage.” By noon the next day, my head felt like a drum and my pace had slowed to a crawl. My mood was sinking with every step. A local guide looked at me and said, “Isi liye hum Shitkadi rukte hain.” This is why we stay at Shitkadi. That single night changed how I plan every trek since. Shitkadi Altitude vs Nichnai: The Real Reason This Night Matters Shitkadi sits at about 2,730 metres (8,960 ft). Sonamarg, where most people stay, is around 2,380 metres (7,800 ft). Nichnai, your first major campsite, is roughly 3,500 metres (11,500 ft). Even starting from Shitkadi, your body faces a climb of 770–900 metres over 11–12 km on KGL Trek Day 1. If you skip this stop and begin straight from Sonamarg, the altitude jump gets sharper. It hits harder too. Most altitude-medicine guidelines say don’t gain more than 300–500 metres in sleeping altitude per day once you cross 2,500 metres. You’ll exceed that either way on Day 1. But starting from Shitkadi makes it less brutal. Is Overnight Stay at Shitkadi Mandatory? You can skip overnight stay at Shitkadi and some trekkers do. But unless you’re an endurance athlete, a local used to altitude, or someone who has already done a few high-altitude treks and knows how your body reacts, it’s a gamble. Most Kashmir Great Lakes Trek operators schedule a mandatory acclimatization night at Shitkadi. There’s a reason for that. Too many strong city trekkers struggle on Day 1 simply because they rushed the start. Fitness helps, but it doesn’t protect you from altitude stress. What Actually Happens in Your Body When you go higher, your breathing rate and heart rate increase within hours. Your body starts producing more EPO, a hormone that eventually leads to higher red blood cell counts. That part takes days. Not overnight. So no, one night at Shitkadi won’t fully acclimatise you. What it does is give your body time to begin adjusting. It slows the altitude jump the next day. It lowers your risk of AMS symptoms on KGL Trek Day 1. Think of it like easing into cold water instead of jumping straight in. What the Shitkadi Campsite Is Actually Like Open meadow beside a river Alpine tents (2–3 people per tent) Sleeping bags and mats provided Basic dry pit toilets No permanent structures Limited or no mobile network At night, it gets cold even in summer. Single-digit temperatures are common in June and September. The sky, though, is unreal. Clear. Deep. Full of stars. The second time I stayed here, I woke early just to sit outside my tent. A shepherd passed with his sheep and smiled. It felt like a quiet blessing before the climb. Food, Sleep, and Comfort at Shitkadi Food here is simple and filling. Expect dal-rice-roti-sabzi for dinner, porridge-omelette-toast for breakfast, and limited hot water for tea or washing. Sleep is usually better here than at higher camps. Fewer headaches. Calmer breathing. Deeper rest. And that rest shows on your face the next morning. Shitkadi vs Skipping It: A Quick Comparison Factor Stay at Shitkadi Skip Shitkadi Altitude gain on Day 1 Gradual Steep (1,100m+) Risk of headache Lower Higher Energy levels Better Often drained Group bonding Stronger Rushed Trek mood Calm start Stressful start Drop-out risk Low Higher I’ve seen both sides. The calmer start almost always wins. Practical Logistics Most People Forget From Srinagar, it’s a 2.5–3 hour drive covering about 80 km to Sonamarg. Then another 3–4 km by road to Shitkadi. It’s not complicated. It just feels long after a flight. The ideal arrival time at Shitkadi basecamp is between 2 pm and 4 pm. This gives you daylight to rest, settle in, and attend the trek briefing without feeling rushed. If you arrive early, walk around the meadow. Check your gear. Drink water. You can visit Sonamarg town, but don’t overdo it. Save your legs. Cost of Overnight Stay at Shitkadi If you’re with an organiser, the cost is usually included. If arranged separately, expect ₹1,500–₹2,500 per person. This includes a tent, meals, and a sleeping bag. Prices change by season and demand. It’s one of the cheapest insurance policies you’ll ever buy on a trek. Seasonal Temperatures at Shitkadi The weather here shifts more than people expect. June: Day 12–18°C, Night 5–8°C July: Day 10–16°C, Night 3–7°C September: Day 8–14°C, Night 0–5°C Even in peak summer, nights feel sharp. Warm layers aren’t optional. Why I Personally Never Skip This Night I’ve done this trek twice. Both times, I stayed at Shitkadi. The first time taught me its value. The second time reminded me of its charm. Every trek has a mood, and Shitkadi sets a gentle tone. I like starting my journey with calm, not chaos. The Real Takeaway Staying at Shitkadi is not about comfort. It’s about respect for your body, mountain and for the journey ahead. So when you plan the Start of the trek for the Kashmir Great Lakes Trek, ask yourself one honest question: Do you want to rush into the mountains with a pounding head, or walk in with a steady breath and a quiet smile? FAQs Can I skip Shitkadi if I’m fit?You can. You shouldn’t. Fitness doesn’t protect you from altitude. Read more about fitness preparation for Kashmir Great Lakes Trek. Is there a mobile network at Shitkadi?Mostly no. Sometimes BSNL works faintly. Are toilets available?Yes. Basic dry pit toilets. Is drinking water available?Yes. Treated water is provided at camp.

Why You Should Stay Overnight at Shitkadi Before Starting the Trek Read More »

Shitkadi Village Campsite

What Happens on Arrival at Shitkadi Basecamp

Shitkadi basecamp sits at roughly 2,370–2,600 metres, about 5 kilometres beyond Sonamarg and right beside the Sindh River. This is the official starting point for the Kashmir Great Lakes Trek. This page explains exactly what happens from the moment you arrive until you sleep on your first night. If you know how arrival day works, half your trek planning stress disappears. Where Shitkadi Is and Why Treks Start Here Shitkadi is a wide alpine meadow chosen for one reason – safe acclimatisation. After a long road journey from Srinagar, your body needs time to adjust before trekking begins. This altitude allows that adjustment without pushing you too hard on day one. The meadow is flat, open, and close to water sources. That makes it ideal for organised camping, health checks, and group coordination. This one night is not about adventure. It is about preparation. Drive to Shitkadi: Distance, Route, and Timing Day 0 usually begins in Srinagar. We arrange group transport so everyone reaches together and on time. Distance from Srinagar: 75–90 km Driving time: 3–4 hours Route: Srinagar → Ganderbal → Kangan → Sonamarg → Shitkadi Pickups are commonly scheduled at 10:00 AM from locations like Nishant Garden or the Dal Lake. After Kangan, the road follows the Sindh River and the mobile network gradually fades. Army Check-post and ID Requirements All vehicles entering Shitkadi pass through an army check post. This is routine and applies to everyone. You must carry: One original government-issued photo ID Two photocopies of the same ID Aadhaar card, voter ID, or passport are accepted. Foreign nationals must carry passport and valid visa documents. Keep these accessible, not packed deep inside your bag. Arrival Timeline: What the First Few Hours Look Like Arrival usually happens between 2:00 PM and 4:00 PM. The schedule is kept deliberately relaxed. Arrival: Vehicles park near the meadow Next 30 minutes: Tent allocation and bag placement Within 1 hour: Tea and light snacks Late afternoon: Trek briefing and health checks 7:00–8:00 PM: Dinner By 9:00 PM: Rest time There is no trekking on this day. The focus is rest and adjustment. Campsite Facilities at Shitkadi Basecamp Facilities here are basic but well managed. This is a high-altitude campsite, not a hotel. You can expect: Dome tents on twin or triple sharing Clean dry pit or bio-toilets Safe drinking water provided by our team A separate dining tent Charging is not guaranteed. Limited charging may be possible at the kitchen generator, but you should arrive with fully charged power banks. Network coverage is usually unavailable. Food and Hydration on Arrival Day Hot tea and light snacks are served soon after you settle in. This helps with warmth and hydration after the drive. Dinner is served early, usually between 7:00 and 8:00 PM. Meals are warm, simple, and easy to digest. Heavy or oily food is avoided on purpose to help you sleep better at altitude. We encourage steady hydration through the afternoon and evening, even if you do not feel thirsty. Health Check: What We Measure and Why Health checks are a core part of how we operate at Shitkadi. Each trekker undergoes basic monitoring. We usually check: Oxygen saturation (normal here is around 95–98%) Resting pulse rate These readings give us a baseline. If oxygen levels are low or pulse is consistently high at rest, we observe closely and guide hydration and rest. Early reporting of headache or nausea helps us act before problems escalate. Kashmir Great Lakes Trek Briefing: What Gets Covered The main briefing happens in the late afternoon once everyone has arrived. It covers: The full route of the Kashmir Great Lakes Trek Daily distances and expected walking hours Terrain and weather patterns Safety rules and pace discipline Next morning’s routine and packing guidance This ensures everyone starts the trek with clear expectations. What to Carry Specifically for Arrival Day Arrival day packing is simple. Keep essentials handy. Carry: Original ID and photocopies Power bank One warm jacket or fleece Personal medicines Reusable water bottle Avoid unpacking everything. You will repack properly the next morning. Common Arrival-Day Mistakes and What to Do Instead Small mistakes on Day 0 often show up as bigger issues later. Here is how to avoid them. Walking too much on arrival → Do this instead: Limit movement to short, slow walks near camp Skipping water because it feels cold → Do this instead: Sip small amounts regularly Sitting outside without layers after sunset → Do this instead: Layer up early Ignoring mild headache or uneasiness → Do this instead: Inform the trek leader immediately Weather Differences: July vs September Arrivals Arrival conditions change across the season. In July, days are warmer and the meadow is lush green. Light rain showers are common, so rain protection matters. In September, days are cooler and nights are colder. The air is drier, and warm layers become essential after sunset. Regardless of the month, evenings cool down fast at Shitkadi. If You Arrange Your Own Transport Some trekkers prefer reaching independently. Taxi costs from Srinagar usually range between ₹750 and ₹3,500, depending on vehicle type and season. If you choose this option, coordinate arrival timing in advance and aim to reach before evening. Late arrivals affect acclimatisation and briefing schedules. Shitkadi is calm by design. It gives your body time to slow down, breathe easier, and settle into a mountain rhythm. Handle this first day well, and the higher trails of the Kashmir Great Lakes Trek Basecamp journey feel far more manageable from the very start. FAQ’s Is there a mobile network at Shitkadi basecamp? No. Mobile networks like Airtel, Jio, and BSNL rarely work at shitkadi basecamp. Inform family before leaving Srinagar. What documents are required at the army checkpost? One original government-issued photo ID with two photocopies is required. Foreign nationals must carry passports and valid visa documents. Can I charge my phone at Shitkadi basecamp? Charging is not guaranteed. Limited charging may be possible at the kitchen generator. Carry a fully

What Happens on Arrival at Shitkadi Basecamp Read More »

Exit Points on Kashmir Great Lakes Trek

Exit Points on Kashmir Great Lakes Trek (2026)

The Kashmir Great Lakes trek exit points are very limited, and once you move beyond Vishansar Lake, evacuation becomes slow, costly, and physically demanding, which is why exit planning is critical for anyone trekking in 2026. If you are researching this properly, you are already doing the right thing. This trek is breath taking, but it is not forgiving when things go wrong. This guide exists to help you understand where you can realistically get out, when you must turn back, and what actually happens in emergencies. What this guide is based on (read this once) This article is compiled using: Safety protocols followed by licensed Kashmir trek operators Inputs from local guides operating between Sonamarg and Naranag Documented evacuation cases shared by operators from 2019–2025 Standard evacuation practices aligned with Indian Mountaineering Foundation norms This is not marketing content. It is a decision-support guide for trekkers. Trek season and safety context for 2026 For 2026, the expected operational window remains: Trek season: 1 July to 15 September Safest period: Mid-July to late August Higher risk periods: Early July (snowmelt) and September (weather instability) Most reported evacuation cases on Kashmir Great Lakes trek happen during the shoulder periods, not peak season. Planning dates wisely reduces evacuation risk more than fitness alone. Kashmir Great Lakes exit points map (2026) Before reading tables or procedures, you need a visual sense of the terrain. Exit points here are about geography, not theory. How to read the route The trek starts near Sonamarg and ends at Naranag Camps progress through Nichnai, Vishansar, Gadsar, Satsar, and Gangbal Vishansar Lake is the last manageable decision point for turning back Everything after that involves serious logistics. Exit points on Kashmir Great Lakes Trek: camp-by-camp reference table This trek needs comparison, not assumptions. Use this table when planning or reassessing mid-trek. Camp Location Exit Type Typical Evacuation Time Road Access Risk Level Practical Reality Sonamarg / Nichnai Planned 2–4 hours Yes Low Easiest and safest exit Vishansar Camp Conditional 6–8 hours At Sonamarg Moderate Last realistic turn-back Gadsar Camp Emergency only 8–11 hours (often split) Near Gagangir High Weather & porter dependent Satsar Region Carry-out only 1–2 days No Very High No functional exit Gangbal → Naranag Planned 4–6 hours descent Yes Low Final road access This table is the backbone of your exit planning. Altitude and evacuation difficulty: why exits get harder Altitude directly affects evacuation difficulty on this trek. Nichnai Camp (~3,505 m): Mild altitude stress, easy descent Vishansar Lake (~3,658 m): Moderate altitude, long descent Gadsar (~3,810 m; pass ~4,206 m): High altitude, difficult terrain Satsar / Gangbal (3,500–3,650 m): Remote, no nearby roads Higher altitude plus remoteness is what turns small issues into serious evacuations. Why Vishansar Lake is the real point of no easy return Unlike most Himalayan treks, this route does not offer frequent road exits. Vishansar Lake is where flexibility ends. Before Vishansar, evacuation usually means walking back. After Vishansar, evacuation means porters, time, and money. Many serious incidents escalate because trekkers choose to “see how it goes” beyond this point. This is why experienced guides reassess health very strictly here. Emergency evacuation procedure (Kashmir-specific reality) Evacuation on this trek is slower than on popular routes due to terrain and local restrictions. The standard process followed is: Medical assessment and stabilisation at camp Decision on walk-out versus carry-out Communication with base team (often via satellite phone) Arranging porter or mule support Movement only during daylight due to safety norms Evacuation paced around weather windows, not urgency alone Night evacuation is avoided unless life-threatening. Passes often close after noon due to weather shifts. Always Choose Your: Best Time for Kashmir Great Lakes Trek Emergency contacts every trekker must save Local numbers change seasonally and are shared during trek briefings. These never change across India: All-India Emergency: 112 Ambulance services: 108 Medical access hierarchy Primary Health Centre at Sonamarg District hospitals at Ganderbal or Kangan Major hospitals in Srinagar Always confirm local authority and operator emergency contacts before starting the trek. Real evacuation case studies from this route Case Study 1: Gadsar Camp, August 2024 Trekker: Male, 32, average fitness Issue: Severe altitude sickness Wrong decision: Continued beyond Vishansar despite early AMS symptoms Evacuation route: Gadsar → Gagangir Time: ~11 hours over two days Cost: ~₹32,000 Outcome: Full recovery after hospitalisation Key lesson: Symptoms ignored at Vishansar often become emergencies later. Case Study 2: Nichnai sector, July 2023 Trekker: Female, 41 Issue: Knee ligament strain Decision: Immediate descent Evacuation: Walk-back to Sonamarg Time: ~3 hours Outcome: Same-day medical care Key lesson: Early exits work when taken early. Cost reality of emergency evacuation Evacuation here is manpower-heavy. Porter or mule support: ₹15,000–₹25,000 per day Additional guide coordination: ₹5,000–₹8,000 Transport to Srinagar: ₹3,000–₹6,000 Extra stay and food: Variable Insurance helps only if evacuation is documented and operator-supported. Safety issues, accidents, and illness on this trek Serious accidents on this trek are rare, but evacuations do happen. Most escalate due to delayed decisions, not sudden disasters. If someone feels sick on the Kashmir Great Lakes Trek, the safest action is early descent, not rest days at high camps. Choosing the right season reduces evacuation risk more than pushing fitness limits. How this trek compares to others Compared to routes like Kedarkantha or Hampta Pass, this trek: Has fewer exit points Has longer carry-out distances Depends heavily on human evacuation Penalises delayed decisions This is not a trek where casual planning works. Understanding exit points on Kashmir Great Lakes Trek is not about fear. It is about respect for terrain that gives you unmatched beauty but very little margin for error. Before you cross Vishansar Lake, pause and ask yourself honestly.If someone in my group cannot walk tomorrow, do we know exactly what we will do next?

Exit Points on Kashmir Great Lakes Trek (2026) Read More »

Health Risks on Kashmir Great Lakes Trek

Fitness Preparation for Kashmir Great Lakes Trek

The Kashmir Great Lakes Trek is a beautiful but tough trek. It takes you through high mountains, green meadows, and blue lakes. But this trek is not easy. It needs good fitness and strong stamina. Walking for long hours on steep paths can be hard if you are not ready. To enjoy the trek, you must train your body. A good fitness plan will help you walk long distances without feeling too tired. This guide will show you how to get fit for the Kashmir Great Lakes Trek in three months. Follow this plan, and you will have a great trek without trouble.    Why Fitness is Important for This Trek This trek is about 75 km long. You will walk for 6 to 8 hours daily. The trek starts at 7,800 feet and reaches up to 13,750 feet. At high altitudes, oxygen is less. You may feel breathless or tired if you are not fit. The biggest challenges are: Walking long hours: Your legs need to be strong. Climbing steep slopes: You need good balance and energy. Less oxygen at high altitude: Your lungs must work well. Carrying a backpack: You need strength to carry your bag. If you prepare well, you will enjoy the trek. If not, you may feel very tired, and it will be hard to complete the trek.  Click here to first understand: The Kashmir Great Lakes Trek difficulty level    3-Month Fitness Plan for the Kashmir Great Lakes Trek This 12-week plan will help you get stronger and fitter. Follow these simple exercises. You don’t need a gym, just regular practice. Week 1-4: Build Strength and Stamina Walking and Running Walk 5 km daily at a fast speed. Run for 20-30 minutes, 3-4 times a week. Climb stairs instead of using the lift. Leg and Core Strength Squats – Do 3 sets of 15. Lunges – Do 3 sets of 10 per leg. Plank – Hold for 30-40 seconds. Step-ups – Step on a high box, 3 sets of 10. Balance and Flexibility Stretch every day to avoid injuries. Do yoga poses like Downward Dog and Cobra Stretch. Week 5-8: Increase Endurance and Strength Long Walks and Hikes Walk 8-10 km once a week. Try to walk on hilly or uneven paths. Carry a backpack with 5 kg weight. Cardio and Strength Training Run for 40 minutes at least 4 times a week. Jumping squats and burpees to boost stamina. Do pull-ups and push-ups to strengthen your arms. Breathing and Altitude Training Practice deep breathing exercises. If possible, train at a high-altitude place. Week 9-12: Prepare Like a Trekker Simulated Trek Training Trek for 12 km once a week on hilly paths. Walk with a 8-10 kg backpack. Increase walking speed and endurance. Final Strength and Recovery Do strength exercises 3 times a week. Stretch well after every workout. Take enough rest and drink more water. Also Read: Safety Tips of Kashmir Great Lakes Trek   Training for High Altitude and Oxygen Levels At high altitude, the air is thin. It is hard to breathe. You must prepare your lungs to adjust. Here’s how you can train: Deep breathing: Practice inhaling deeply and exhaling slowly. Pranayama: Yoga breathing helps lungs take in more oxygen. Stay at a high-altitude place: Spend a few days before the trek at a higher altitude if possible.    Healthy Diet Plan for Trek Training Eating the right food is just as important as exercise. Your body needs energy for trekking. Follow this simple diet plan. 3 Months Before the Trek Eat more proteins – Eggs, fish, chicken, lentils, and paneer. Eat complex carbs – Brown rice, whole wheat bread, and oats. Drink enough water – 3-4 liters daily to stay hydrated. During the Trek Eat carbs for energy – Rice, roti, and potatoes. Eat healthy snacks – Nuts, dry fruits, and protein bars. Drink at least 3 liters of water daily to avoid dehydration.   Mental Preparation for the Trek This trek is not just about physical strength. It also needs mental strength. Think positive: Be prepared for challenges but focus on the beauty of the trek. Trek at your own pace: Do not rush. Walk slowly and enjoy the journey. Stay calm: If you feel tired, take deep breaths and relax.    Essential Trekking Gear and Equipment Being fit is important, but having the right gear also makes a big difference. Must-Have Trekking Gear Trekking Shoes – Good grip and ankle support are important. Trekking Poles – Help reduce pressure on knees. Waterproof Jacket – Weather changes quickly, so carry a raincoat. Light Backpack – A 40-50L backpack with padded straps. Other Essentials Headlamp or Torch Gloves, Woolen Cap, and Warm Socks Sunscreen and Sunglasses Get the full list of: Things to Carry for Kashmir Great Lakes Trek   Final Checklist Before the Trek Make sure you do these before leaving: Walk 10-12 km with a backpack to test your endurance. Train for at least 3 months to be physically fit. Test your trekking shoes to avoid blisters. Get a medical check-up to ensure you are fit for high altitudes. Stay hydrated and eat well before and during the trek. The Kashmir Great Lakes Trek is a once-in-a-lifetime adventure. But to enjoy it, you must be physically ready. A 3-month training plan with walking, running, strength exercises, and altitude training will prepare you well. Start training early, eat nutritious food, and pack the right gear. Follow this guide, and you will have a safe, enjoyable, and memorable trek! Also Read These Essential Information to Plan Your Kashmir Great Lakes TrekTarsar Marsar Trek vs Great Lakes TrekKashmir Great Lakes Trek Do’s and Don’tsCampsites On The Kashmir Great Lakes TrekLakes On Kashmir Great Lakes TrekHow to Reach Base Camp of Great Lakes Trek FAQ’s How fit do I need to be for the Kashmir Great Lakes Trek? The Kashmir Great Lakes Trek is a moderate to difficult trek, requiring good endurance, leg strength, and stamina. You should be able to

Fitness Preparation for Kashmir Great Lakes Trek Read More »

Kashmir Great Lakes Trek Cost

Kashmir Great Lakes Trek Cost​

Kashmir Great Lakes trek cost comes to around ₹17,000 per person for a Srinagar-to-Srinagar package, based on standard company pricing. This total depends on what’s included, such as transport, permits, meals, and camp stay. Below, we break the cost head by head, so you can see clearly what you’re paying for and decide if it fits your plan. Average trek package cost: ₹15,500 per person (Sonamarg to Sonamarg).   Transportation cost: ₹1,500 per person (Srinagar to Srinagar).   Total cost to plan for: ₹17,000 per person.   Duration covered in this cost: Full multi-day trek, from reporting day to exit day.   What’s usually included: All vegetarian meals, campsite stay, tents and sleeping gear, experienced trek leaders and staff, safety equipment, permits, and insurance.   What’s usually excluded: Lunch on the first day, personal expenses, and anything not listed in inclusions.   Ideal buffer budget: Keep ₹2,000–₹3,000 extra for personal needs or optional porter service. Prices can still feel different across operators, even for the same route. Why? Group size, staff experience, food quality, safety backup, and how well logistics are handled all affect the final KGL trek price. On a long, remote trek like this, those small differences often matter more than saving a few hundred rupees. Inclusions in Kashmir Great Lakes Trek Cost The Kashmir Great Lakes trek cost covers all the essentials needed to complete the trek safely and comfortably, without cutting corners. Here’s what is included in the standard package, broken down simply. Accommodation (camp stay): You stay in high-quality tents at all campsites. Tents are on a double-sharing basis and are set up at scenic, safe locations near water sources. Sleeping bags and sleeping mattresses are provided, so you don’t need to carry bulky gear from home.   Meals (all trek days): The package includes breakfast, lunch, evening snacks, and dinner on trek days. Food is vegetarian, hot, and planned to keep energy levels steady at altitude. Dishes are rotated, so meals don’t feel repetitive after a few days on the trail.   Trek staff and support team: Experienced mountaineering trek leaders, local guides, and trained cooks accompany the group throughout. These are people who know the route, weather patterns, and camps well, which matters more than most trekkers realise on long alpine walks.   Permits and forest fees: All required passes and permits for the Kashmir Great Lakes route are arranged and included. You don’t have to run around offices or worry about paperwork in an unfamiliar region.   Safety gear and medical support: Basic mountain medical support is part of the setup. This includes a first-aid kit and an oxygen cylinder for emergencies. On a remote trek like this, that backup brings real peace of mind. In short, the cost takes care of the core trek experience, letting you focus on walking, breathing, and soaking in those endless blue lakes. What Is Not Included in the Trek Cost The trek cost does not cover a few personal and travel-related expenses, which you should plan for separately. These exclusions are common across most Kashmir Great Lakes trek packages and are easy to manage if you know them in advance. Travel to Srinagar: Flights or train tickets to reach Srinagar are not part of the trek cost. You arrange these on your own, based on your city and travel preference.   Personal gear rental: Items like trekking shoes, jackets, backpacks, or trekking poles are not included. If you don’t own them, you can rent them separately before the trek.   Emergency evacuation: While basic medical support and oxygen are available on the trek, any emergency evacuation or hospitalisation costs are not included.   Personal expenses: This covers things like snacks you buy on the way, tips, phone charging, souvenirs, or anything else you spend on for personal comfort.   Lunch on the first day: The first day’s lunch is not included, as travel timings can vary. These exclusions matter because they shape your real budget. Many trekkers focus only on the headline price and forget these small add-ons. Planning for them early avoids last-minute stress and keeps your trek experience smooth and worry-free. Kashmir Great Lakes Trek Cost Breakdown (Expense-Wise) Travel Cost to Srinagar Reaching Srinagar is the first cost you plan for, and it changes a lot with timing. Flights are the fastest option, but prices swing wildly between peak summer and shoulder weeks. Book late in July, and fares jump. Book early in June, and you usually breathe easier.  Trains take longer and need a road leg at the end, yet they feel gentler on the wallet if you plan ahead. Add a short taxi or shared cab ride to close the gap. In short, season and booking window decide most of this cost, not distance alone. Trek Package Price The trek package forms the core of what you pay on the trail. Most operators cluster around a similar band because the route, camps, and permits are fixed. What changes is the experience. Smaller groups, experienced leaders, better food planning, and stronger safety backups cost more to run.  Budget options often stretch group size and trim comforts. Premium setups invest in staff ratios and logistics. That’s why the KGL trek price can feel different even on the same map. Group size matters too. Fewer trekkers mean better support, but a slightly higher per-person cost. Permits, Fees & Documentation Cost All trekkers need official permits to walk this route, and these are usually handled by the trek operator. Forest permissions and local passes are mandatory in Kashmir.  In standard packages, these fees are already included, so you don’t stand in queues or chase signatures. If you trek independently, you handle the paperwork yourself and absorb the cost directly. For most people, bundled permits save time and nerves. Gear Rental Cost (Optional but Common) Gear rental is optional, yet many first-timers choose it to travel light. Trekking shoes for grip and ankle support Insulated jackets for cold nights Sleeping bags if you prefer personal

Kashmir Great Lakes Trek Cost​ Read More »

Shitkadi Campsite on Kashmir Great Lakes Trek

Five Valleys on the Kashmir Great Lakes Trek (Route Explained for Real Trekkers)

Valley Trek Days Distance Difficulty Altitude Range Key Features Shitkadi Valley Day 1–2 11 km Easy 2,800 m – 3,300 m Green meadows, acclimatisation, gentle start Nichnai Valley Day 2–3 12 km Moderate 3,300 m – 4,100 m Sheep pastures, snow patches, Nichnai Pass Gadsar Valley Day 4 9 km Moderate to Difficult 4,100 m – 3,600 m High-altitude pass, alpine lakes, wildflowers Satsar Valley Day 6 9 km Moderate 3,700 m – 4,000 m Seven alpine lakes, rocky terrain, wide views Gangbal Valley Day 7–8 14 km Moderate 4,000 m – 3,500 m Sacred lake, Mount Harmukh views, trek finish The Five Valleys on the Kashmir Great Lakes Trek unfold over six trekking days. You begin in the gentle meadows of Shitkadi Valley, push through the narrow stretches of Nichnai Valley, tackle the wild terrain of Gadsar Valley, walk patiently across the long basin of Satsar Valley, and finally reach the wide, dramatic Gangbal Valley beneath Mount Haramukh.  Each valley brings a different challenge, mood, and pace, shaping how the trek actually feels on your body and mind. If you understand these valleys, you understand the trek. Lakes are bonuses. Valleys decide everything else. Also Check: Best Time for Kashmir Great Lakes Trek Why Valleys Matter More Than the Lakes Most people planning the Kashmir Great lakes trek focus on lake names and photos. That excitement is fair. But once you start walking, valleys become your entire world. A valley controls how long you walk, how cold your nights feel, and how tired you get before dinner. It decides whether clouds get trapped, whether streams overflow, and whether your legs feel light or heavy. When someone asks me if this trek suits them, I never talk about altitude first. I talk about valleys. They reveal patience, mindset, and stamina far more honestly. Your Day-by-Day Valley Journey You do not jump randomly between valleys. The trail flows naturally, and knowing this helps you pace yourself mentally. Day 1: Enter Shitkadi Valley from Sonamarg Day 2: Cross Nichnai Pass into Nichnai Valley Day 3: Climb Gadsar Pass and descend into Gadsar Valley Day 4: Walk through Gadsar towards Satsar Valley Day 5: Cross into Gangbal Valley Day 6: Descend towards Naranag Once you see this progression, the trek stops feeling mysterious and starts feeling manageable. Day 1–2: Shitkadi Valley (Your Gentle Entry) Shitkadi Valley is where most trekkers begin their journey from Sonamarg. The valley opens wide, with soft grass underfoot and clear streams running beside the trail. This valley feels friendly. Almost too friendly. That is why people make mistakes here. You feel strong. You walk fast. You laugh loudly. Then the evening hits, and altitude quietly reminds you where you are. Headaches, loss of appetite, or restless sleep are common. Shitkadi teaches your first lesson. Slow down even when the trail feels easy. What to keep in mind here Altitude gain begins immediately Hydration matters more than speed This is acclimatisation, not a warm-up Day 2–3: Nichnai Valley (Where Patience Is Tested) Nichnai Valley changes the mood of the trek. The trail narrows. The valley feels enclosed. Streams cut across your path repeatedly. Shoes get wet. Socks stay damp. Clouds hang low even on clear days. Walking feels longer than the distance suggests. This is where many trekkers question their decision. Nothing dramatic happens. The effort is simply constant. I have seen strong walkers struggle here, not physically, but mentally. Nichnai asks you to accept discomfort without complaint. Real challenges of Nichnai Long walking hours with few visual rewards Cold winds near the pass Easy to underestimate the day Crossing Nichnai calmly prepares you for the heart of the KGL Trek Valleys. Day 3–4: Gadsar Valley (The Wild Core of the Trek) Gadsar Valley feels raw and untamed. The climb to Gadsar Pass is steep and exposed. Wind picks up early. Breathing becomes deliberate. This valley does not hide its difficulty. Weather shifts quickly. Sunshine can turn into hail without warning. Then comes the reward. As you descend, lakes appear suddenly. The valley opens up. Fatigue mixes with awe. Many trekkers call this the most beautiful section. I call it the most honest. Gadsar gives back exactly what you put in. Respect this valley Start pass crossings early Carry rain protection even on clear mornings Stay close to your group Day 4–5: Satsar Valley (The Silent Test) Satsar Valley is wide, quiet, and deceptively simple. Seven lakes sit scattered across the basin. The terrain stays mostly flat. This is not a hard day physically. It is a long one mentally. The scenery changes slowly. Landmarks feel distant. Time stretches. People who rely on excitement struggle here. Satsar teaches you to walk without needing constant reward. If you enjoy silence, this valley feels peaceful. If not, it feels heavy. Mental checkpoints Eat regularly even if appetite drops Stay present, not impatient Walk your own pace Day 5–6: Gangabal Valley (The Emotional High Point) Gangabal Valley opens suddenly and stays with you long after the trek ends. Mount Harmukh rises dramatically in the background, watching over the twin lakes. After days of enclosed valleys, this openness feels healing. People walk slower here, not from fatigue, but from disbelief. This valley brings reflection. You think about your first day. You think about moments you wanted to quit. Completion feels quiet and personal. For many, this becomes the emotional peak of the Kashmir Great lakes trek. Why Gangbal stays unforgettable Vast landscapes calm tired minds Campsites feel earned The journey finally settles inside you Which Valley Is the Hardest and Which Is the Most Beautiful People often ask this as if there is one right answer. There is not. Hardest for endurance: Nichnai Valley Hardest physically: Gadsar Pass in Gadsar Valley Most dramatic: Gadsar Valley Most peaceful: Satsar Valley Most emotionally rewarding: Gangabal Valley Your experience depends on your mindset, not just fitness. Final Thoughts to Carry With You The Five Valleys on the Kashmir Great Lakes Trek are not just landscapes. They

Five Valleys on the Kashmir Great Lakes Trek (Route Explained for Real Trekkers) Read More »